I enjoyed playing in the free practice games over the weekend for the upcoming ACBL NABC Robot Individual July 11-13. Here are two hands from the first practice session where I scored 67%. The robots helped me on some hands and aggrieved me on others. Here are a couple of hands where I helped myself. On both hands it was important to be alert and focused in order to make the right play.
1. First is a defensive hand where I had to be on my toes to beat the contract.
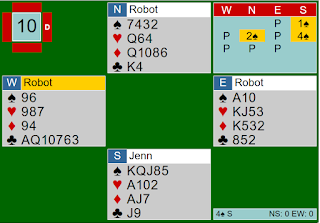
Despite my opening the bidding, the opponents got to 4♠ without any trouble. Partner led the ♣10, which I encouraged, and declarer won the ♣Q. Declarer next led a trump to the ♠Q and I won the ♠A. I returned the ♣9 which declarer won. Now he cashed the ♠K dropping partner's ♠J. That meant that my ♠10 was good, so I had another spade trick.
It looked like I also had a club winner and a diamond winner--which would be enough to beat the contact.
Now declarer played two rounds of hearts, ruffing the third round on the board. Next came a club from the board. This was the position when I won the ♣J.
This was the moment to be extremely careful and think through the play. Pause and decide, dear reader...what should I play next?
If you're not alert, it may seem normal to play another club, forcing declarer to ruff. But if you do that, look what happens.
Declarer will simply ruff, then throw you in with a trump, the ♠10, and you have no choice but to lead a diamond away from your ♦K into the ♦AQ tenace! You would be well and truly endplayed and would hand declarer the contract!
No. Instead, I looked ahead to see what was coming, and FIRST cashed my high trump before exiting with the ♣K. Now declarer is forced to take the losing diamond finesse and the contract goes down.
Beating 4♠ got an 84% board, whereas carelessly letting it make gets a 37% score or worse!
2. Next is a hand where I had to, first, get to the best contract, and then make it!
Jumping to 4♠ may be a little aggressive, but bidding and making tough contracts is how you get good scores!
I got the ♦9 lead and paused to consider the dummy.
The contract didn't look that great--with possible losers in each suit. Plus, the ♣A needed to be on my left, etc. But, back to the opening lead. Maybe it could be helpful. What do I play from the dummy?
Actually, as often happens, the declarer's play to trick one is the key to the hand.
Question: What do I want to happen at trick one? Answer: I really, really, REALLY want East to play the ♦K which will set up the whole diamond suit and give me a chance of making the contract. So, I played the ♦Q at trick one. East now made the ordinary and expected play of covering the ♦Q with the ♦K, which I won.
This was a good start as it gave me tricks as well as an entry to the board, should I need it.
During the play, I drew trump, lost the ♣A and got to the board with a diamond to pitch a heart. I only lost 1 spade, 1 heart and 1 club--so I made 4♠. This was worth 87.5% of the matchpoints. Only 4 of 13 pairs in my section bid game, and only two pairs made it.
At the end of the day I was in 78th place out of a whopping 2223 players.
On Day 2 my score was 62% and I ended up in 54th place overall, out of 1803 players.
The ACBL seems to be doing what it can to keep us entertained and winning points during these trying times. The prospect of winning a national event from the comfort of home certainly has its appeal!
See you at the virtual tables!
Subscribe to:
Post Comments (Atom)


No comments:
Post a Comment